Tuesday 7 July 2015

Guitar neck reset


I seem to feature a lot of 19th century guitars on this blog: here is another example. This was a recent restoration commission; the neck had pulled forward significantly resulting in an unplayable action. This is a common problem encountered on old guitars.

The guitar is by Valance, a French maker working in the first half of the 19th century, and is typical of guitars of this period, the back and sides are of flamed maple, the front of spruce and all the details are ebony and ivory. Aesthetically it is typical of many of these French guitars with a simple rosette, figure of eight headstock and elegant smiling bridge.

This guitar had been restored at some point in the past ( the evidence points to the back having been removed) but was still in lovely condition and the owner was not unreasonably anxious about the major work to be undertaken.


Of all the neck joins used in guitar construction, this is possibly the simplest. The neck itself is made of 3 main parts, the headstock, the main shaft of the neck and then a separate triangular heel, with the grain running at 90 degrees to the neck itself. This is commonly referred to as an 'ice-cream cone heel'. The neck is joined with a simple butt-join; no dovetail or mortise, just 2 carefully fitted surfaces and animal glue. It seems an incredibly precarious method of attaching a neck, but this one had remained solidly glued for nearly 200 years and the reason for the neck reset was not due to a failing in the neck itself, but a distortion in the body, possibly caused by the previous restoration.


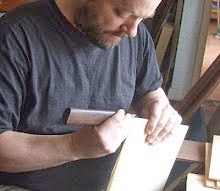
In order to gain access to the neck join it was necessary to remove a small portion of the spruce that made up the flush fingerboard. Hide glue is perhaps the easiest glue to disassemble and the inlays came apart easily as can be seen in the picture below. The neck join itself however proved more challenging, partly because I was being so careful not to damage the beautiful and original finish.In the end it took 7 hours of painstaking work to remove this neck; patience was the most valuable tool in the workshop that day.


The job of realigning the neck is simple, in theory at least. A small amount of wood is removed from the heel to adjust the overall neck/body geometry and the action and alignment are constantly checked. The neck is reglued to the body and the fingerboard section and inlay reinstalled.
This guitar was fitted with gut rather than nylon strings and it was lovely to have it restrung and properly playable again. The only sign that any work had been done was that the action and saddle were now at the correct height!


Wednesday 13 May 2015

Stauffer 'Legnani' copy


This guitar is a copy of  a J.G. Stauffer from the first half of the 19th century. This guitar, with an adjustable neck, extended floating fingerboard and 6-aside tuners,  was an instrument that Stauffer developed in conjunction with the  virtuoso guitarist  Luigi Legnani.

I've been building this guitar on and off for about 18 months now. It wasn't a commission but one of those projects that has to tick away quietly in some dark corner of the workshop to provide a bit of light relief when building to commission becomes momentarily too stressful. In fact, building something different from the normal guitars I build is a good way of sharpening ones wits, and the unfamiliar subtleties  on an otherwise familiar structure keeps you fresh and inquisitive.I have repaired a number of Stauffer guitars in my career but never made one, and the temptation to build an adjustable neck and use those tuners proved just too big a temptation.


The picture below  shows the Stauffer alongside a partially completed Lacote copy that I made some time ago. The Lacote has a veneered back whilst the Stauffer is solid. All Stauffer guitars I have seen have veneered backs so this was a departure from the original. I chose to build these guitars 'back first' although I am pretty sure that many 19th century guitars were built with the top being fitted first.


The picture below shows the minimalist bracing of the soundboard. The bridge plate is not featured on the original, but is there to protect the underside of the soundboard from string wear and it is unlikely to affect the tonal qualities of the instrument. The 2 supporting cleats are also my additions; they are there to reinforce the soundboard join. Although a departure from the original, I feel the longevity these features might add to the guitar are worth it


 The picture below shows the simple adjustable neck mechanism, supplied by Rubner of Germany. It is a  simple mechanism. Turning the key moves a bolt on a threaded rod anchored in the end block, the tension of the strings pulls the neck forward and thereby increases the the height of the strings. Turn the key the other way and the action is lowered. Guitars with adjustable necks make a lot of sense; a player can set the guitar to his own playing style, set it to match the requirements of a particular piece of music, or correct humidity related changes.


This guitar was made from salvaged Cuban mahogany which I love. It was so old and dry ( cut from a Victorian drawer top) that I wondered if it would cope with the tight bends required for the very waisted Staufer shape. It did thankfully, but my heart was in my mouth for 10 minutes whilst I bent these ribs.


 Above; a detail of the raised fingerboard on this guitar.


 The distinctive 6 aside tuners are made by Rubner. David Rodgers also makes a fabulous replica set which I would use for future orders.
This style of tuner adds weight to the neck and the buttons are quite close together, but this is something you  quickly adapt too. This neck is ebonised using a black french polish.

The final picture below shows the elegant simplicity of this guitar which I love; perhaps I should build all my guitars like this.


Tuesday 5 May 2015

Concert Guitar (New Guitars Part 2)


This is just a short post to highlight a rather striking guitar I completed and delivered in February. It is an example of my concert guitar with a cedar soundboard and rosewood back and ribs. It is fitted with a rather fine set of Rodgers tuners


I was very pleased with this guitar; cedar can be a really rewarding wood to work with. The back and sides are rather pretty too.....


Monday 12 January 2015

1888 Torres SE122 copy (New guitars Part I)


Last week was a busy one, as I was eager to get back in the workshop after the Christmas and New Year break. It was a week for final polishing and stringing up of guitars, the first one being this Torres replica guitar in spruce and rosewood and Cuban mahogany. Last year I measured and drew Antonio Torres SE122; a wonderful guitar that was auctioned at Bromptons (London) in October. This is the first copy I have made of the guitar, and also one of the most faithful replicas I have made of any guitar. The top is an exact copy, even down to the startling grain orientation (the grain lines run 3 degrees off the centre line) and the mixture of rosewood for the back centre strip and sides, with mahogany for the main part of the back.


The original sounded lovely, with a soft, full sound and it responded effortlessly under the fingers. I certainly didn't set out to replicate the sound of an 130 year-old guitar; I wanted to get an idea of what this guitar was like when it was first new; the sounds that Torres first heard when he strung SE122 up in his workshop. The new guitar is crisper, more incisive and more even across the range, but with the same rich depth in the bass and a purity in the treble. I will be fascinated to see this guitar again when it has been played for a few years.

One of the great pleasures in building this guitar was using Cuban mahogany. All the Cuban I have is salvaged from 19th century furniture and it really is fantastic timber with the most glorious rich colour when polished. There is a good supply of old furniture that can be converted into guitars and I enjoy putting it to good use. Sometimes you have to work with nail holes or cuts that were in the original piece, but Torres did the same; there are examples of his guitars that were made from salvaged material with plugged screw holes.


The rosette is an accurate copy of the original, but is fresher in colour. Again, I wanted to make it as it would have looked when new, with bright and vibrant colours. The design is so typical of Torres inlay work and is a strong, sophisticated yet simple statement. The bridge is a little longer than I would use on my own guitars, and longer than on many Torres guitars that I have seen. What caused Torres to do this is unclear, but it seems he did most thing carefully and and deliberately so it is unlikely that it was an accident. Perhaps Torres want to add cross grain stiffness to that particular soundboard (it did seem quite stiff) or perhaps he just liked the look of the longer bridge. The 2 mother of pearl roundels on the wings of the bridge very often look out of place on a more modern guitar but I think, in this case, fit perfectly into Torres's aesthetic.


The tuners I used on this guitar are Rubners with plain brass plates and small round buttons and although different from the originals,I think they suit the guitar well. I currently putting together another copy of this guitar and I am keen to make a comparison.
 I have  had a number of enquiries about the drawing I made of this guitar, and when I get the time I will be making all the information I have available. If you are interested in purchasing a copy please let me know and I will update you when it is published