Tuesday 30 November 2010

Gluing on a back

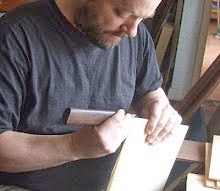
Here is the back to Johns guitar being glued, a job that always uses all of my wooden cam clamps. The pressure is spread by a shaped rim that sits around the edge of the guitar. I like using this method; every so often I think I ought to come up with a more elegant solution, but this is simple and it works. The only drawback is that the clamped guitar takes up a lot of room on the workbench, so I tend to glue up at the end of the day and allow the glue to cure overnight, ready for unclamping the following morning. I know some guitar makers like a jig,mold or tool for every job but I choose to work simply and not to have my workshop cluttered with equipment I only use occasionally.
Here is the back fully glued on and trimmed flush with the ribs. ( When did I start calling them ribs rather than sides...?) This is always a great stage in the build, as this is a fine opportunity to tap and flex the soundboard. Now I am thinking of the purfling and binding; I am going to use 4 matched cocobolo bindings that I know will complement the Amazon rosewood beautifully.
How much work will be done to day is unclear. Yesterday 20 cm of snow fell and brought chaos to a country not used to such weather. To my children's delight, their school shut because of the snow and it is shut again today, so playing outside (for me too) is the order of the day.


Thursday 18 November 2010

Vicente Arias


The Vicente Arias guitar that I worked on earlier on in the year has been attracting alot of attention, so I thought I would post a few more images of it. Apparently this guitar was selected by Julian Bream for a cousin who wished to play guitar, although Bream has not been personally associated with Arias guitars to my knowledge. This is a plainly decorated guitar but the picture of the rosette illustrates the precise and delicate nature of the workmanship.


The bridge had lifted badly and so needed to be removed and re-glued. The picture above shows part of the process, and an original locating mark on the soundboard. The bridge is very dark, plain rosewood and completely unadorned.

This picture of the heel shows some delicate and graceful carving.
The label is incredibly faded and is not the later, and more familiar, 'medallion' type.
The picture below is of the headstock with a fine piece of Brazilian rosewood as the facing.
These final pictures show some internal details. The picture above shows the foot, or slipper (and some old repair cleats) and the picture below is a detail of the back bar, bent lining and side support.

The wrong sort of strings...

The wrong kind of strings and too many of them as well. In over 23 years of running a guitar making workshop, this is the first time ever that I have had a pair of 12 strings on the bench, so worth a mention I feel. I enjoy seeing steel strings and have even been made 1 or 2. These 3 are in for some adjustment.At the front is a John Kinnaird baritone 12, based on the Stella that Leadbelly played, and it has a really impressive sound. Paul's Yamaha needs the action bringing down a bit as did the Collings at the back. I like Collings although they represent a different guitar world from the one I know. Although there are some profound differences between steel string guitar technology and classical guitar, there is always something I can learn and enjoy from studying a good steel strung guitar.

Guitar assembly

Here are are a few pictures of Johns guitar coming together. With all the parts completed, the transformation from kit to guitar is very rapid, but it is a process that takes the uttermost care. It is at this point that precise final fitting takes place, and checks are made to ensure that the geometry and tensioning is as required. This is my more traditional instrument and the strutted soundboard would be familiar to Torres and Hauser. Behind the ribs in this picture are the tentellones ( the small blocks that hold the ribs onto the soundboard), the endblock and the neck wedges. On this guitar all these internal details have been made from salvaged mahogany. Old Victorian drawer fronts have been the donor in this case; when I cut into them there was a wonderful and indescribable smell of dry, aged wood, quite unlike sawing fresh timber.
On this model of guitar I use the Spanish method of building, with the integral neck. The ribs are held into the neck by wooden wedges which, when correctly fitted, push the sides firmly against the heel. I polish the inside of the block, for no other reason that it looks fine and finished.
Finally, all the parts are assembled, the last job is to individually glue in the tentellones with hide glue. This is the the last opportunity to study the inside of the guitar as soon the back will be fitted and glued, and the instrument will be a step nearer completion. Many makers have lamented the fact that all this detailed and precise work is lost from view!

Wednesday 10 November 2010

Headstock work

The first winter storms are here with strong winds and lashing rain. Before getting into the workshop today I ventured down to the beach and was exhilarated by the waves. A dry, warm workshop is the place to be today.
Here are some pictures of a headstock I completed a few weeks ago for John's guitar. The back and ribs of this guitar are made from perfectly quarter sawn Amazon rosewood which is simple but elegant to look at. As such I felt it needed a few exotic details such as the use of snakewood for the headstock facing. This really is a special timber and the mottled figuring really is unique. A snakewood tree yields very little precious timber; usable trunks are rarely more than 20 cm in diameter. It has been used for turned decorative items such as walking sticks and lace bobbins and for the ribs of lutes and early guitars. It is very hard but polishes beautifully. I have carved round string ramps on this head. It gives me the opportunity of using a small mallet that was made for me many years ago by fellow guitar making student Nick Swann. The head is made of Lignum Vitae, an incredibly hard and resilient timber.
This a view of the side of the headstock just after the holes for the tuner barrels have been drilled. I use a stepped drill for this. This ensures the end of the barrel is held accurately and securely, but the barrel at the plate end does not bind. I like the fine lines of veneer between the cedar of the neck and the snakewood head plate.
The machine heads on John's guitar are Rodgers, held by many as the finest tuners in the world. They are indeed magnificent. David Rodgers has been making these tuners for years now and the wealth of experience he has is phenomenal. His great work is being continued by his son Robert. They are of course beautifully made and classically elegant to look at, but most importantly they work supremely well.